
思考题
Thinking 1.1
编写程序hello.c
#include <stdio.h>
int main()
{
    printf("Hello World!\n");
    return 0;
}
只进行预处理+重定向输出
gcc -E hello.c > output.txt
/* 由于原输出太长,这里只能留下很少很少的一部分。 */
typedef unsigned char __u_char;
typedef unsigned short int __u_short;
typedef unsigned int __u_int;
typedef unsigned long int __u_long;
typedef signed char __int8_t;
typedef unsigned char __uint8_t;
typedef signed short int __int16_t;
typedef unsigned short int __uint16_t;
typedef signed int __int32_t;
typedef unsigned int __uint32_t;

typedef signed long int __int64_t;
typedef unsigned long int __uint64_t;

extern struct _IO_FILE *stdin;
extern struct _IO_FILE *stdout;
extern struct _IO_FILE *stderr;

extern int printf (const char *__restrict __format, ...);
int main()
{
    printf("Hello World!\n");
    return 0;
}
只编译不链接
gcc -c hello.c
反汇编
objdump -DS hello.o > output.txt
hello.o: file format elf64-x86-64

Disassembly of section .text:

0000000000000000 <main>:
0:  55                push %rbp
1:  48 89 e5          mov %rsp,%rbp
4:  bf 00 00 00 00    mov $0x0,%edi
9:  e8 00 00 00 00    callq e <main+0xe>
                      #本该填写 printf 地址的位置上被填写了一串 0。
e:  b8 00 00 00 00    mov $0x0,%eax
13: 5d                pop %rbp
14: c3                retq
编译并链接,生成可执行文件
gcc hello.c -o hello
objdump -DS hello > output.txt
hello: file format elf64-x86-64

Disassembly of section .init:

00000000004003a8 <_init>:
4003a8: 48 83 ec 08             sub $0x8,%rsp
4003ac: 48 8b 05 0d 05 20 00    mov 0x20050d(%rip),%rax
4003b3: 48 85 c0                test %rax,%rax
4003b6: 74 05                   je 4003bd <_init+0x15>
4003b8: e8 43 00 00 00          callq 400400 <__gmon_start__@plt>
                                #填写printf地址处填写了puts@plt标记的位置
4003bd: 48 83 c4 08             add $0x8,%rsp
4003c1: c3                      retq

Disassembly of section .plt:

00000000004003d0 <puts@plt-0x10>:
4003d0: ff 35 fa 04 20 00       pushq 0x2004fa(%rip)
4003d6: ff 25 fc 04 20 00       jmpq *0x2004fc(%rip)
4003dc: 0f 1f 40 00             nopl 0x0(%rax)
#......
向objdump传入参数的含义:
objdump -DS 要反汇编的目标文件名 > 导出文本文件名
-D:反汇编所有的section-S:尽可能反汇编出源代码,在编译时指定了-g等调试参数时效果明显,该选项隐含了-d参数
所以该指令的意义是尽可能反汇编出所有section的源代码
Thinking 1.2
使用我们编写的readelf解析内核ELF文件:
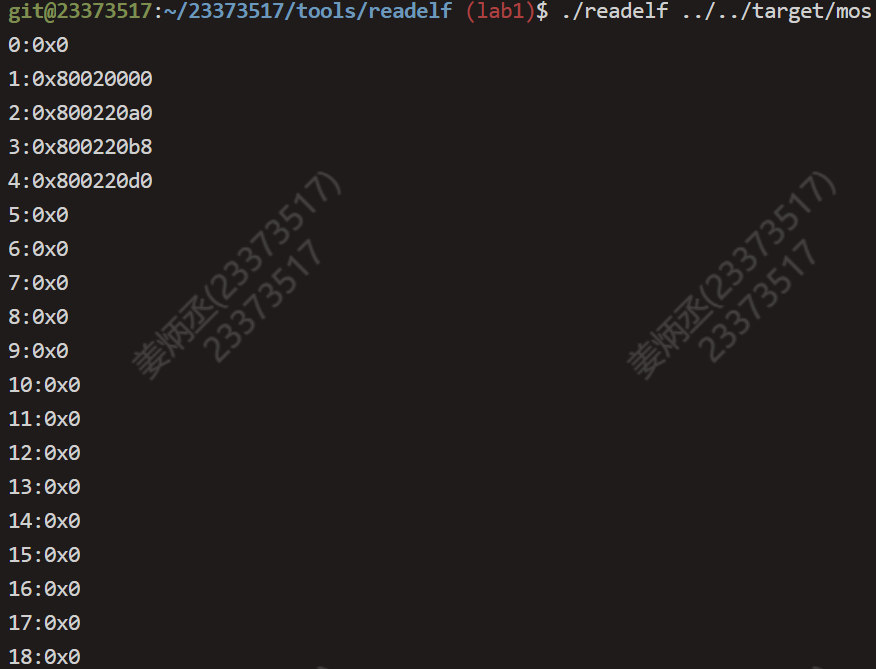
使用我们的readelf解析它本身,无任何输出结果
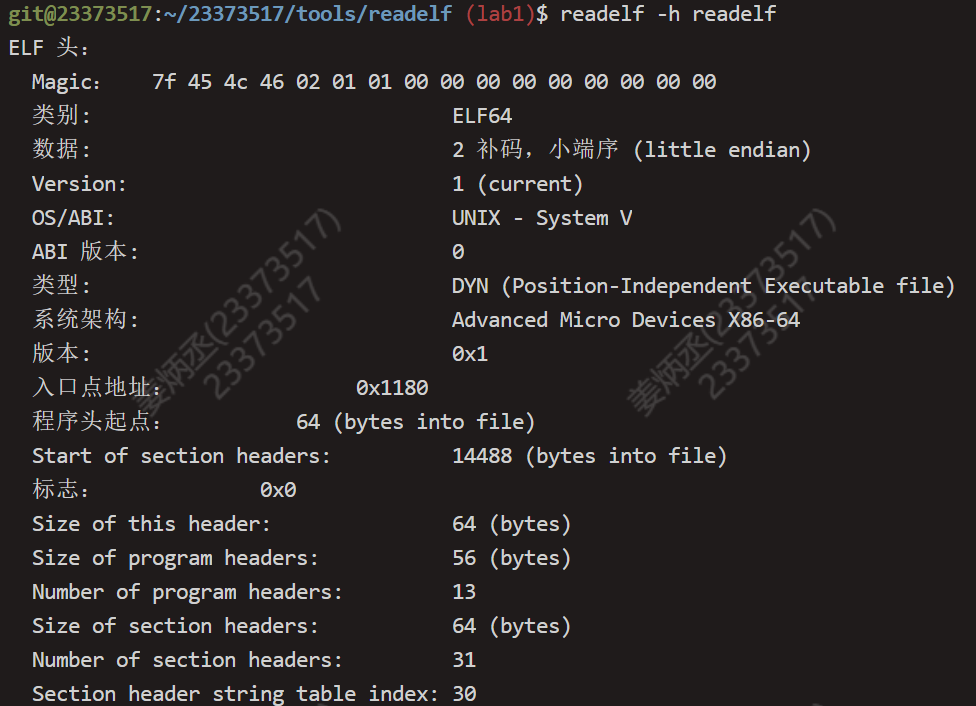
使用系统自带的readelf工具解析我们的readelf文件:
Makefile中是这样的:
readelf: main.o readelf.o
		  $(CC) $^ -o $@
hello: hello.c
          $(CC) $^ -o $@ -m32 -static -g
可以看到hello是静态链接的。静态链接会将程序运行时所依赖的所有库文件(如标准 C 库、数学库等)的代码都复制到最终生成的可执行文件中,这样生成的可执行文件不依赖系统中安装的动态库,具有更好的可移植性,但文件通常会比较大。
Thinking 1.3
我们的实验采用QEMU模拟器,不需要再实现bootloader的功能
QEMU 支持加载 ELF 格式内核,所以启动流程被简化为加载内核到内存,之后跳转到内核的入口,启动就完成了。
-
加载内核到内存,我们的依据是链接脚本文件
kernel.lds。我们已经在这个文件中填写好了各个section加载的位置,通过它,生成的程序各个section的位置就被调整到了我们所指定的地址上。同时我们在该文件中指定了程序的入口点ENTRY(_start),即把内核入口定为 _start 这个函数。ENTRY(_start) SECTIONS { . = 0x80020000; .text : { *(.text) } .data : { *(.data) } .bss : { *(.bss) } bss_end = .; . = 0x80400000; end = . ; } -
跳转到内核的入口,我们通过对
/init/start.S中_start函数的设置,就可以正确的跳转至mips_init函数EXPORT(_start) .set at .set reorder mtc0 zero, CP0_STATUS la sp, 0x80400000 j mips_init
难点分析
Makefile语法
-
变量
变量名 := 内容内容一般是文件,可以有一个也可以有多个
引用变量使用
$target_dir := target # MOS 构建目标所在目录 mos_elf := $(target_dir)/mos # 最终需要生成的 ELF 可执行文件 user_disk := $(target_dir)/fs.img # MOS 文件系统使用的磁盘镜像文件 link_script := kernel.lds modules := lib init kern # 需要生成的子模块 objects := $(addsuffix /*.o, $(modules)) # 遍历需要生成的目标文件 -
PHONY
在 Makefile 里,
PHONY是一个特殊的目标(target),其作用是告诉make工具,某个目标并非代表一个实际的文件,而是一种伪目标。经过PHONY声称的目标,在make时会直接执行,而不会去检查是否存在名为clean的文件,也不管依赖文件是否被修改.PHONY: 目标名 -
目标
目标名可以是变量,依存文件也可以是变量,因为变量本身就可以是文件
all: $(mos_elf) # 我们的“最终目标” $(mos_elf): $(modules) # 调用链接器 $(LD) 链接所有目标文件 $(LD) $(LDFLAGS) -o $(mos_elf) -N -T $(link_script) $(objects) $(modules): # 进入各个子目录进行 make $(MAKE) --directory=$@ -
MAKE变量
MAKE是Makefile里的一个特殊变量,其值为当前正在使用的make程序,一般就是make命令本身。使用$(MAKE)而非直接写make,能保证在不同系统或者环境下都能正确调用make程序。--directory=$@是make命令的一个选项,--directory可以简写为-C,其作用是改变当前工作目录到指定目录。$@是Makefile中一个自动变量,代表当前目标的名称。$(modules): # 进入各个子目录进行 make $(MAKE) --directory=$@ -
all
一般在写 Makefile 时,习惯将第一个规则命名为
all,也就是构建整个项目的意思。如果调用 make 时没有指定目标,make 会自动执行第一个目标,所以把all放在 第一个目标的位置上,可以使得make命令默认构建整个项目,较为方便。 -
$
$在Makefile中有两种用法
变量引用:使用单个 “$”符号加上用括号或花括号括起来的变量名来引用在Makefile中定义的变量。
VAR = value
echo ${VAR}
函数调用:
$(函数名 参数)
ELF
ELF文件是一种文件格式,有三种形式:
- 可重定位文件.o
- 可执行文件
- 共享目标文件.so
ELF文件结构如下:

-
ELF文件头:包括程序的基本信息,比如体系结构和操作系统,同时也包含了节头表和段头表 相对文件的偏移量(offset)。
typedef struct { unsigned char e_ident[EI_NIDENT]; // 存放魔数以及其他信息 Elf32_Half e_type; // 文件类型 Elf32_Half e_machine; // 机器架构 Elf32_Word e_version; // 文件版本 Elf32_Addr e_entry; // 入口点的虚拟地址 Elf32_Off e_phoff; // 程序头表所在处与此文件头的偏移 Elf32_Off e_shoff; // 节头表所在处与此文件头的偏移 Elf32_Word e_flags; // 针对处理器的标记 Elf32_Half e_ehsize; // ELF 文件头的大小(单位为字节) Elf32_Half e_phentsize; // 程序头表表项大小 Elf32_Half e_phnum; // 程序头表表项数 Elf32_Half e_shentsize; // 节头表表项大小 Elf32_Half e_shnum; // 节头表表项数 Elf32_Half e_shstrndx; // 节头字符串编号 } Elf32_Ehdr; // ELF头类型 -
段头表(或程序头表,program header table):主要包含程序中各个段(segment)的信息, 段的信息需要在运行时刻使用。
段头表项和段一一对应
typedef struct { Elf32_Word p_type; // 段的类型 Elf32_Off p_offset; // 该段在ELF文件中的偏移量 Elf32_Addr p_vaddr; // 在内存中的虚拟地址 Elf32_Addr p_paddr; // 在物理内存中的地址 Elf32_Word p_filesz; // 在文件中占用的字节数 Elf32_Word p_memsz; // 在内存中占用的字节数(>=p_filesz) Elf32_Word p_flags; // 该程序段的标志位 Elf32_Word p_align; // 该程序段的对齐要求 } Elf32_Phdr; // 段头表项类型 -
节头表(section header table):主要包含程序中各个节(section)的信息,节的信息需要在程序编译和链接的时候使用。
节头表项和节一一对应
typedef struct {
    Elf32_Word sh_name; // 节的名称
    Elf32_Word sh_type; // 节的类型
    Elf32_Word sh_flags; // 节的属性和标志
    Elf32_Addr sh_addr; // 该节在内存中的加载地址
    Elf32_Off sh_offset; // 该节在ELF文件中的偏移量
    Elf32_Word sh_size; // 节的大小
    Elf32_Word sh_link; // 链接其他节的索引
    Elf32_Word sh_info; // 额外信息
    Elf32_Word sh_addralign; // 该节的对齐要求
    Elf32_Word sh_entsize; // 节中条目的大小。如果没有固定大小的条目则为0
} Elf32_Shdr; // 节头表项类型
C语言拾遗
-
void *:泛型指针,可以指向任意类型的数据,不过void *类型的指针本身不包含所指向数据的类型信息,因此不能对它做解引用操作。泛型指针可以被转化成任何指针类型
-
const void *:void *的常量版本。const关键字表示该指针所指向的内容是只读的,不能通过这个指针来修改所指向的数据。 -
指针运算:泛型指针不包含指向数据的类型信息,在加上偏移值时按照1字节处理。其它指针按照本类型的大小处理。如
int a = 1; int *p = &a; // p是int*类型的指针 p = p + 3; // p向后移动3个int大小(3*4字节) int b = 1; void *q = &b; q = q + 3; // q向后移动3个字节 -
指向常量的指针&常量指针:
const <类型> *<指针名>是指向常量的指针,指针指向的对象无法改变,但是指针可以移动<类型> * const <指针名>是常量指针,指针不可移动,但是指向的对象可以变
变长参数函数
有些函数参数列表末尾有省略号,说明该函数使用了变长参数
va_list:这是一种类型,用来声明一个变量,该变量会依次访问参数列表里的参数。va_start:对va_list类型的变量进行初始化,使其指向参数列表的首个可变参数。va_arg:从参数列表里获取下一个参数,并且自动调整指针以指向下一个参数。va_end:在使用完变长参数列表之后,释放va_list类型的变量。
一个简单例子:
#include <stdio.h>
#include <stdarg.h>

// 计算多个整数的和
int sum(int count, ...) {
    va_list args;
    int result = 0;
    int i;

    // 初始化变长参数列表
    va_start(args, count); // count是最后一个形参

    // 遍历参数列表并求和
    for (i = 0; i < count; i++) {
        result += va_arg(args, int); // int代表要获得的参数类型
    }

    // 结束变长参数列表的使用
    va_end(args);

    return result;
}

int main() {
    int result = sum(3, 1, 2, 3);
    printf("Sum: %d\n", result);

    result = sum(5, 1, 2, 3, 4, 5);
    printf("Sum: %d\n", result);

    return 0;
}
我们熟知的printf()函数就使用了变长参数列表,它的函数标签是这样void printk(const char *fmt, ...)
获得文件类型
file 要查看的文件名
readelf基本用法
readelf [option(s)] <elf-file(s)>
readelf -h <elf_file> //查看ELF文件头
readelf -S <elf_file> //查看各节
readelf -l <elf_file> //查看各段
使用 Linker Script
要使用Linker Script来调整各节的位置,将脚本写入链接脚本文件.lds中
SECTIONS
{
	. = 0x10000; // 定位计数器,可设置接下来的节的起始地址
	.text : { *(.text) } // *是通配符,匹配所有的相应的节。意思是将所有输入文件中的.bss节都放到输出的.bss节中
	. = 0x8000000;
	.data : { *(.data) }
	.bss : { *(.bss) }
}
回调函数
回调函数指将A函数作为参数传递给B函数,在B函数内调用A函数
void printk(const char *fmt, ...) {
	va_list ap;
	va_start(ap, fmt);
	vprintfmt(outputk, NULL, fmt, ap); // outputk就是一个回调函数
	va_end(ap);
}
printk()函数内:
void vprintfmt(fmt_callback_t out, void *data, const char *fmt, va_list ap) { // out是回调函数的参数名
	char c;
	const char *s;
	long num;

	int width;
	int long_flag; // output is long (rather than int)
	int neg_flag;  // output is negative
	int ladjust;   // output is left-aligned
	char padc;     // padding char

    for(;;) {
        /*...*/
        out(data, fmt, p - fmt); // 调用回调函数
        /*...*/
    }
    /*...*/
}
与直接在B函数内部调用A函数相比,回调函数有以下好处:
- 函数的调用关系更加灵活,B函数可以通过传入的参数不同来调用不同的函数,而不是在编程时已经写死的某个函数
- 降低不同函数之间的耦合度,如果在B函数内直接调用A函数,B函数的执行依赖A函数,耦合度太高。如果使用回调函数,则B函数的执行不完全依赖A函数,模块的独立性增强。
实验体会
Exercise 1.1
-
我们想要遍历节头表,输出所有节的地址信息,那么我们必须了解3个量:节头表与文件头的偏移、节头表项数、节头表每一项有多大。这3个量都包含在ELF文件头的结构体中
-
ELF文件头、节头表表项、段头表表项都是结构体,其中包含了相应的ELF文件、节、段的信息
-
节头表由若干节头表项组成,段头表由若干段头表项组成。节头表项与节一一对应,段头表项与段一一对应。
-
e_shoff以字节为单位表示偏移量,所以使用指针加它的时候一定要使用泛型指针
我的答案:
int readelf(const void *binary, size_t size) {
    Elf32_Ehdr *ehdr = (Elf32_Ehdr *)binary; // 将泛型指针binary转化为ELF头的指针ehdr

    // Check whether `binary` is a ELF file.
    if (!is_elf_format(binary, size)) {
        fputs("not an elf file\n", stderr);
        return -1;
    }

    // Get the address of the section table, the number of section headers and the size of a
    // section header.
    const void *sh_table; // 节头表指针
    Elf32_Half sh_entry_count; // 节头表项数
    Elf32_Half sh_entry_size; // 节头表项大小
    /* Exercise 1.1: Your code here. (1/2) */
    sh_table = binary + ehdr->e_shoff; // 节头表第一项的地址,注意要用binary来加偏移值
    sh_entry_count = ehdr->e_shnum;    // 节头表项数
    sh_entry_size = ehdr->e_shentsize; // 节头表每一项的大小

    // For each section header, output its index and the section address.
    // The index should start from 0.
    for (int i = 0; i < sh_entry_count; i++) { // 遍历所有的节头表项
        const Elf32_Shdr *shdr; //节头表表项指针
        unsigned int addr;
        /* Exercise 1.1: Your code here. (2/2) */
        shdr = (Elf32_Shdr*)(sh_table + i * sh_entry_size); // 找到节头表项的位置,指向它
        addr = shdr->sh_addr;  // 该节的地址
        printf("%d:0x%x\n", i, addr);
    }

    return 0;
}
Exercise 1.2
通过查看include/mmu.h中的内核内存布局图来确定各节的位置,发现Kernel Text从0x8002 0000开始
/*
 o     4G ----------->  +----------------------------+------------0x100000000
 o                      |       ...                  |  kseg2
 o      KSEG2    -----> +----------------------------+------------0xc000 0000
 o                      |          Devices           |  kseg1
 o      KSEG1    -----> +----------------------------+------------0xa000 0000
 o                      |      Invalid Memory        |   /|\
 o                      +----------------------------+----|-------Physical Memory Max
 o                      |       ...                  |  kseg0
 o      KSTACKTOP-----> +----------------------------+----|-------0x8040 0000-------end
 o                      |       Kernel Stack         |    | KSTKSIZE            /|\
 o                      +----------------------------+----|------                |
 o                      |       Kernel Text          |    |                    PDMAP
 o      KERNBASE -----> +----------------------------+----|-------0x8002 0000    |
 o                      |      Exception Entry       |   \|/                    \|/
 o      ULIM     -----> +----------------------------+------------0x8000 0000-------
 o                      |         User VPT           |     PDMAP                /|\
 o      UVPT     -----> +----------------------------+------------0x7fc0 0000    |
 o                      |           pages            |     PDMAP                 |
 o      UPAGES   -----> +----------------------------+------------0x7f80 0000    |
 o                      |           envs             |     PDMAP                 |
 o  UTOP,UENVS   -----> +----------------------------+------------0x7f40 0000    |
 o  UXSTACKTOP -/       |     user exception stack   |     BY2PG                 |
 o                      +----------------------------+------------0x7f3f f000    |
 o                      |                            |     BY2PG                 |
 o      USTACKTOP ----> +----------------------------+------------0x7f3f e000    |
 o                      |     normal user stack      |     BY2PG                 |
 o                      +----------------------------+------------0x7f3f d000    |
 a                      |                            |                           |
 a                      ~~~~~~~~~~~~~~~~~~~~~~~~~~~~~~                           |
 a                      .                            .                           |
 a                      .                            .                         kuseg
 a                      .                            .                           |
 a                      |~~~~~~~~~~~~~~~~~~~~~~~~~~~~|                           |
 a                      |                            |                           |
 o       UTEXT   -----> +----------------------------+------------0x0040 0000    |
 o                      |      reserved for COW      |     BY2PG                 |
 o       UCOW    -----> +----------------------------+------------0x003f f000    |
 o                      |   reversed for temporary   |     BY2PG                 |
 o       UTEMP   -----> +----------------------------+------------0x003f e000    |
 o                      |       invalid memory       |                          \|/
 a     0 ------------>  +----------------------------+ ----------------------------
 o
*/
我的答案:
SECTIONS
{
    /* fill in the correct address of the key sections: text, data, bss. */
    /* Hint: The loading address can be found in the memory layout. And the data section
            and bss section are right after the text section, so you can just define
            them after the text section.
    */
    /* Step 1: Set the loading address of the text section to the location counter ".". */
    /* Exercise 1.2: Your code here. (1/4) */
  .= 0x80020000;
    /* Step 2: Define the text section. */
    /* Exercise 1.2: Your code here. (2/4) */
   .text : { *(.text) }
    /* Step 3: Define the data section. */
    /* Exercise 1.2: Your code here. (3/4) */
   .data : { *(.data) }
    /* Step 4: Define the bss section. */
    /* Exercise 1.2: Your code here. (4/4) */
    bss_start =. ;
   .bss : { *(.bss) }
    bss_end =. ;
  .= 0x80400000;
    end =. ;
}
Exercise 1.3
通过查看include/mmu.h中的内核内存布局图来确定栈指针的初始位置0x80400000
注意:栈是从高到低增长的
我的答案:
clear_bss_done:
    /* disable interrupts */
    mtc0    zero, CPO_STATUS

    /* hint: you can refer to the memory layout in include/mmu.h */
    /* set up the kernel stack */
    /* Exercise 1.3: Your code here. (1/2) */
    la      sp, 0x80400000 # 加载地址,最好用la
    /* jump to mips_init */
    /* Exercise 1.3: Your code here. (2/4) */
    j       mips_init # 不用返回,用j指令即可
Exercise 1.4
按照给定的格式%[flags][width][length]<specifier>,考虑每部分的情况,逐个解析即可
8/8的部分是输出十进制数,注意neg_flag要根据数值的正负来变化,print_num()的base参数改为10
我的答案:
		/* scan for the next '%' */
		/* Exercise 1.4: Your code here. (1/8) */
		const char * p = fmt;
		while (*p != '%' && *p != '\0') {
			p++;
		}

		/* flush the string found so far */
		/* Exercise 1.4: Your code here. (2/8) */
		out(data, fmt, p - fmt);
		fmt = p;

		/* check "are we hitting the end?" */
		/* Exercise 1.4: Your code here. (3/8) */
		if (*fmt == '\0') {
			break;
		}

		/* we found a '%' */
		/* Exercise 1.4: Your code here. (4/8) */
		fmt++;

		/* check format flag */
		/* Exercise 1.4: Your code here. (5/8) */
		ladjust = 0;
		padc = ' ';
		if (*fmt == '-') {
			ladjust = 1;
			fmt++;
		} else if (*fmt == '0') {
			padc = '0';
			fmt++;
		}

		/* get width */
		/* Exercise 1.4: Your code here. (6/8) */
		width = 0;
		while ('0' <= *fmt && *fmt <= '9' && *fmt != '\0') {
			width *= 10;
			width += *fmt - '0';
			fmt++;
		}

		/* check for long */
		/* Exercise 1.4: Your code here. (7/8) */
		long_flag = 0;
		if (*fmt == 'l') {
			long_flag = 1;
			fmt++;
		}

        /*
         * Refer to other parts (case 'b', case 'o', etc.) and func 'print_num' to
         * complete this part. Think the differences between case 'd' and the
         * others. (hint: 'neg_flag').
         */
        /* Exercise 1.4: Your code here. (8/8) */
        if (num < 0) {
                num = - num;
                neg_flag = 1;
        }
        print_num(out, data, num, 10, neg_flag, width, ladjust, padc, 0);
        break;
体会与感想
相较于边学习边写代码,我更喜欢系统性地全部学习了解了以后再写代码,所以lab1学习的流程就是不停地看指导书,然后遇到不懂的内容立刻去查资料,遇到不会的代码使用工具辅助理解最后着手写代码。
lab1只有最后一个练习的代码量比较大,而且新知识很多,如变长参数列表、回调函数等等。所以我感觉大部分的时间都花在了读代码和理解代码逻辑上。尤其是printk的实现还分了三个文件,层层嵌套,目前我对于多个.c文件之间的关系理解的还比较浅薄,所以很多时间花在了明析各个文件的功能和协同工作上,它们是怎么一起实现一个函数功能的。